
From Prompt to Published Site

Disclaimer: This is based on my personal learning and experience. Views are my own, not official guidance.
A Walkthrough on Building an HTML Overview of Microsoft AI with Copilot, and Hosting it Free on GitHub Pages
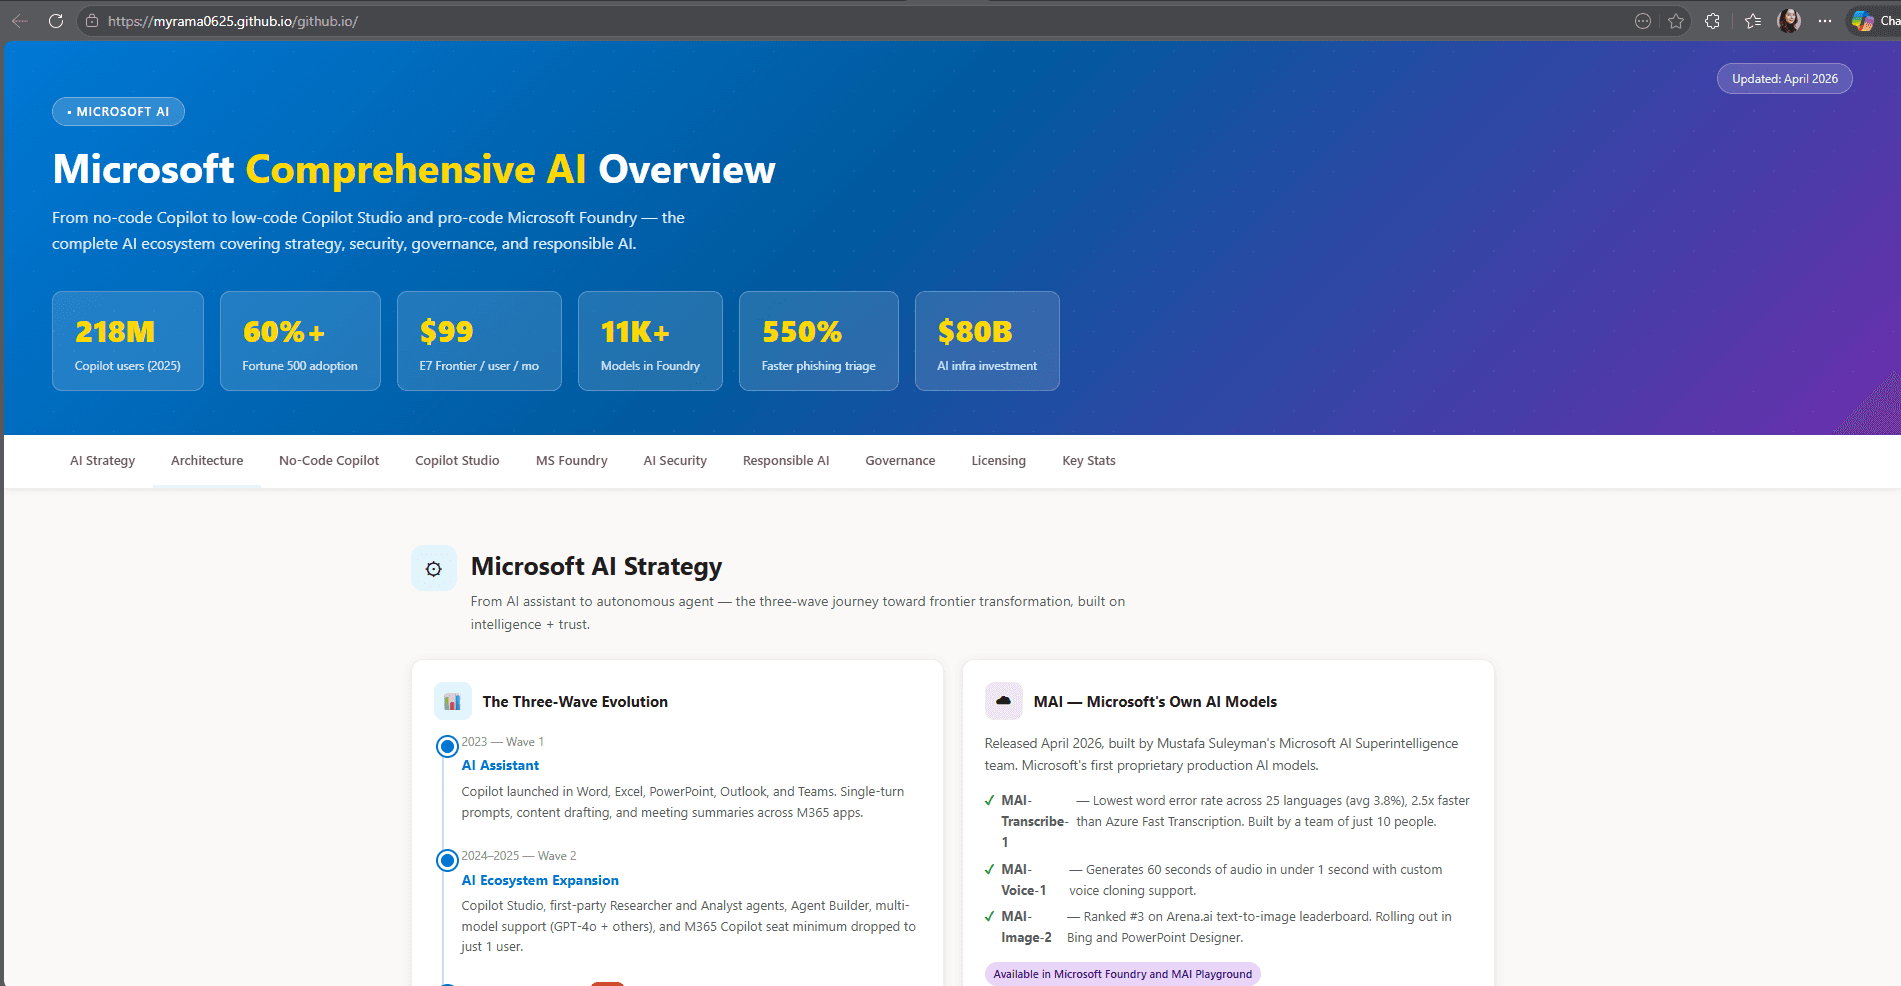
View the live site → https://myrama0625.github.io/github.io/
Why I built this
Three months into Microsoft, I wanted a fast way to make sense of the full landscape of all Microsoft technology, starting from AI capabilities. Instead of reading dozens of articles and public available documentation, I asked Copilot to do the heavy lifting and turn it into an HTML overview I could browse, share, and revisit.
What started as a personal crash course turned into something I could publish on the open internet, for free, in under an hour. This walkthrough captures exactly how I did it so you can do the same — no coding background required.
What you'll get out of this By the end of this walkthrough you will have used Copilot to generate a full HTML page from a single prompt, created a GitHub repository, and published your page live on the internet through GitHub Pages. |
The workflow at a glance
This is a six-step path from blank page to live URL. The whole thing took me under an hour.
1 | Prompt Copilot Ask Copilot to generate an HTML overview of Microsoft AI. |
2 | Save the HTML Copy the response into a file called index.html on your laptop. |
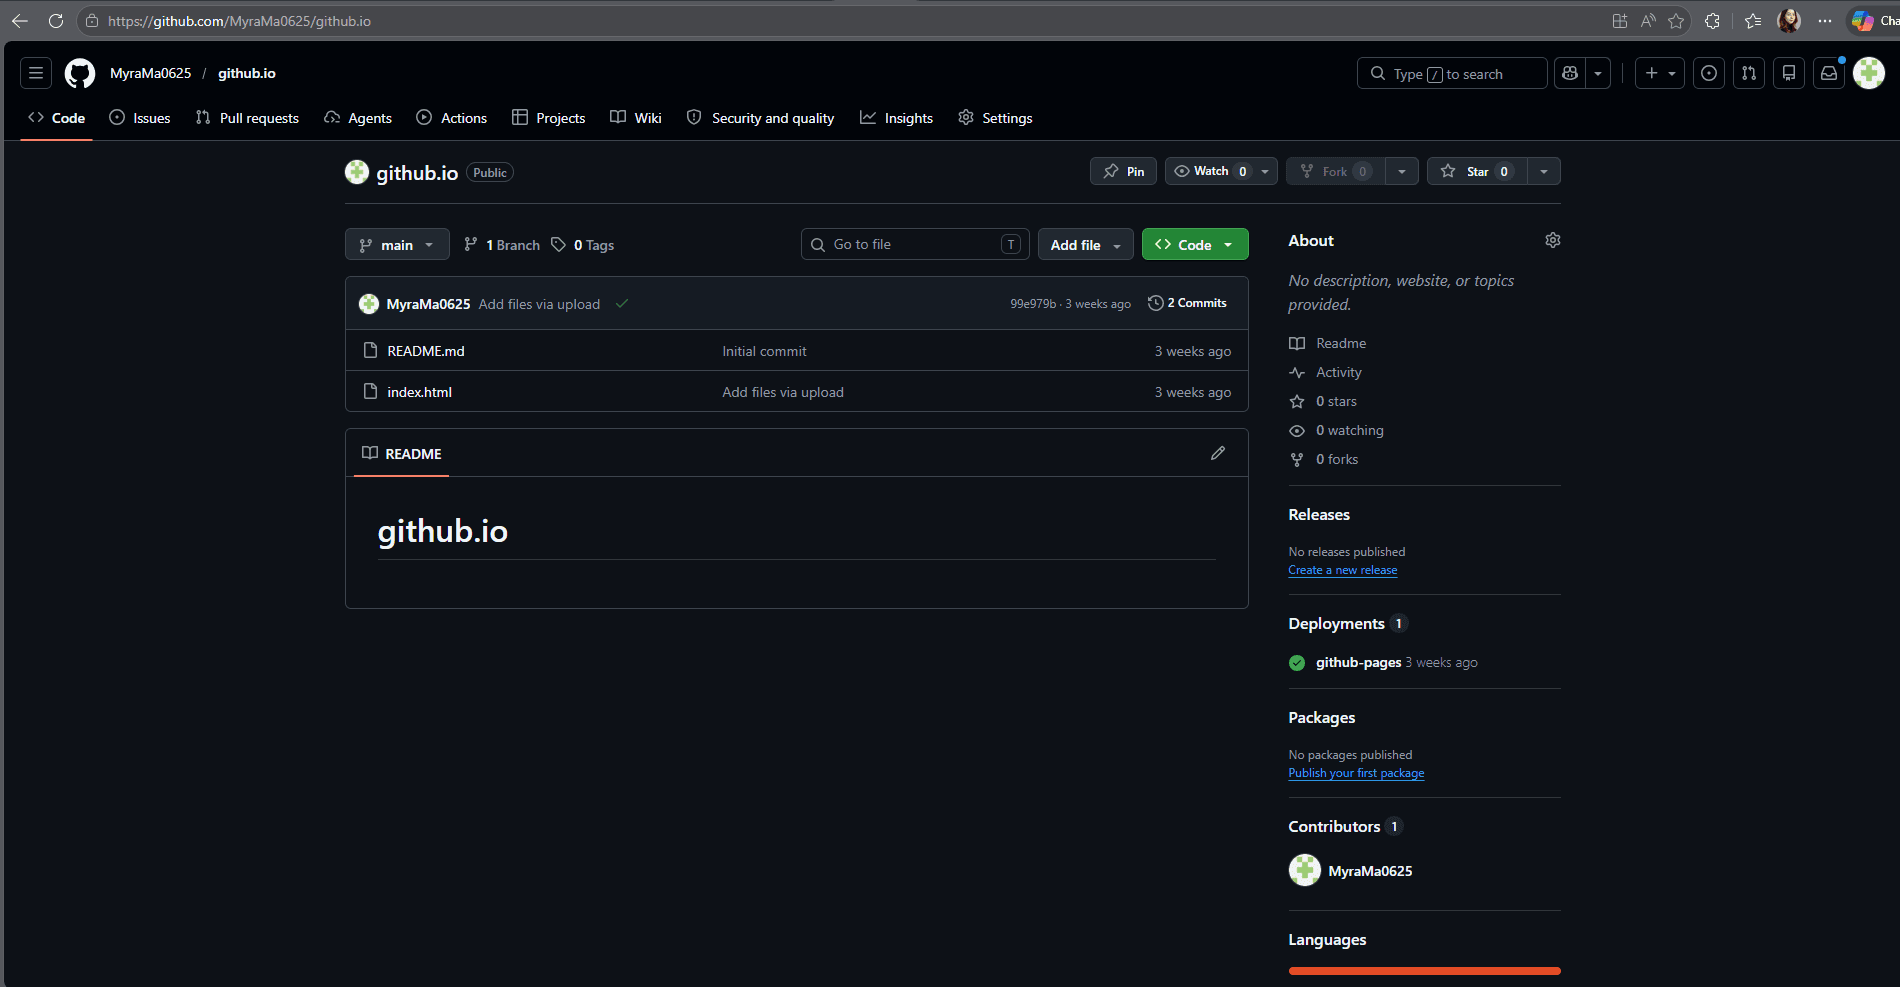
3 | Create a GitHub repo Sign in to GitHub and create a new public repository. |
4 | Upload your file Drag-and-drop index.html into the repo through the browser. |
5 | Turn on GitHub Pages In Settings → Pages, point Pages at your main branch. |
6 | Share the URL Wait a couple of minutes, then share your live link. |
What you'll need
• A Microsoft Copilot account (the free web version works perfectly).
• A free GitHub account (sign up at github.com if you don't have one).
• A web browser. That's it — no code editor, no terminal, no local Git install needed.
• About 30–60 minutes for your first run.
Good to know GitHub Pages is free for public repositories on every GitHub plan. There's no credit card, no trial, and no hidden tier — your site just goes live at https://<your-username>.github.io/<repository-name>/. |
Step 1 — Ask Copilot to generate the HTML
Open Copilot in your browser. Paste in a single, clear prompt that describes what you want and what format you want it in. The clearer the request, the better the structure of the response.
The prompt I used
My one-line prompt Generate a single self-contained HTML page that summarizes all major Microsoft AI capabilities — including Copilot across Microsoft 365, Azure AI, GitHub Copilot, Security Copilot, and developer tools — with clear sections, descriptions, and links to public documentation. |
Copilot returns a full HTML document — typically with a <head>, styling, and clearly labeled sections. You don't need to write or change any code; you just copy the response.

Tips for a better prompt
• Tell Copilot how you want the result structured (sections, bullet lists, tables).
• Ask for it as a single self-contained HTML page so styling lives in the same file.
• If you want a specific look (light theme, branded colours, simple typography), say so.
• Ask for public documentation links — it makes the page genuinely useful as a reference.
Step 2 — Save the HTML on your laptop
1. Open Notepad (Windows) or TextEdit (Mac, in plain text mode).
2. Paste the entire HTML response from Copilot.
3. Save the file with the exact name: index.html — make sure the extension is .html and not .txt.
4. Double-click the file to open it in your browser. You should see your page render locally.
Why "index.html"? GitHub Pages automatically uses the file named index.html as the home page of your site. If your file has any other name, your URL will return a "404" until you rename it. |
Step 3 — Create your GitHub repository
1. Sign in to github.com.
2. Click the + icon in the top-right corner and choose New repository.
3. Give your repo a short name (for example, ms-ai-overview).
4. Set it to Public (this is required for free GitHub Pages hosting).
5. Tick "Add a README file" so the repo isn't empty.
6. Click Create repository.
Pro tip — repository naming If you name the repository <your-username>.github.io, GitHub will publish the site at https://<your-username>.github.io/ (no sub-folder). Any other name gives you https://<your-username>.github.io/<repository-name>/. Both work — pick whichever URL you want. |
Step 4 — Upload your HTML file
You don't need Git or the command line for this. GitHub's web interface lets you drag-and-drop directly.
1. Inside your new repo, click Add file → Upload files.
2. Drag your index.html file into the upload area.
3. At the bottom, type a short message such as: "Add Copilot-generated overview".
4. Click Commit changes.
Your file is now stored on GitHub — but the website isn't switched on yet. That's the next step.
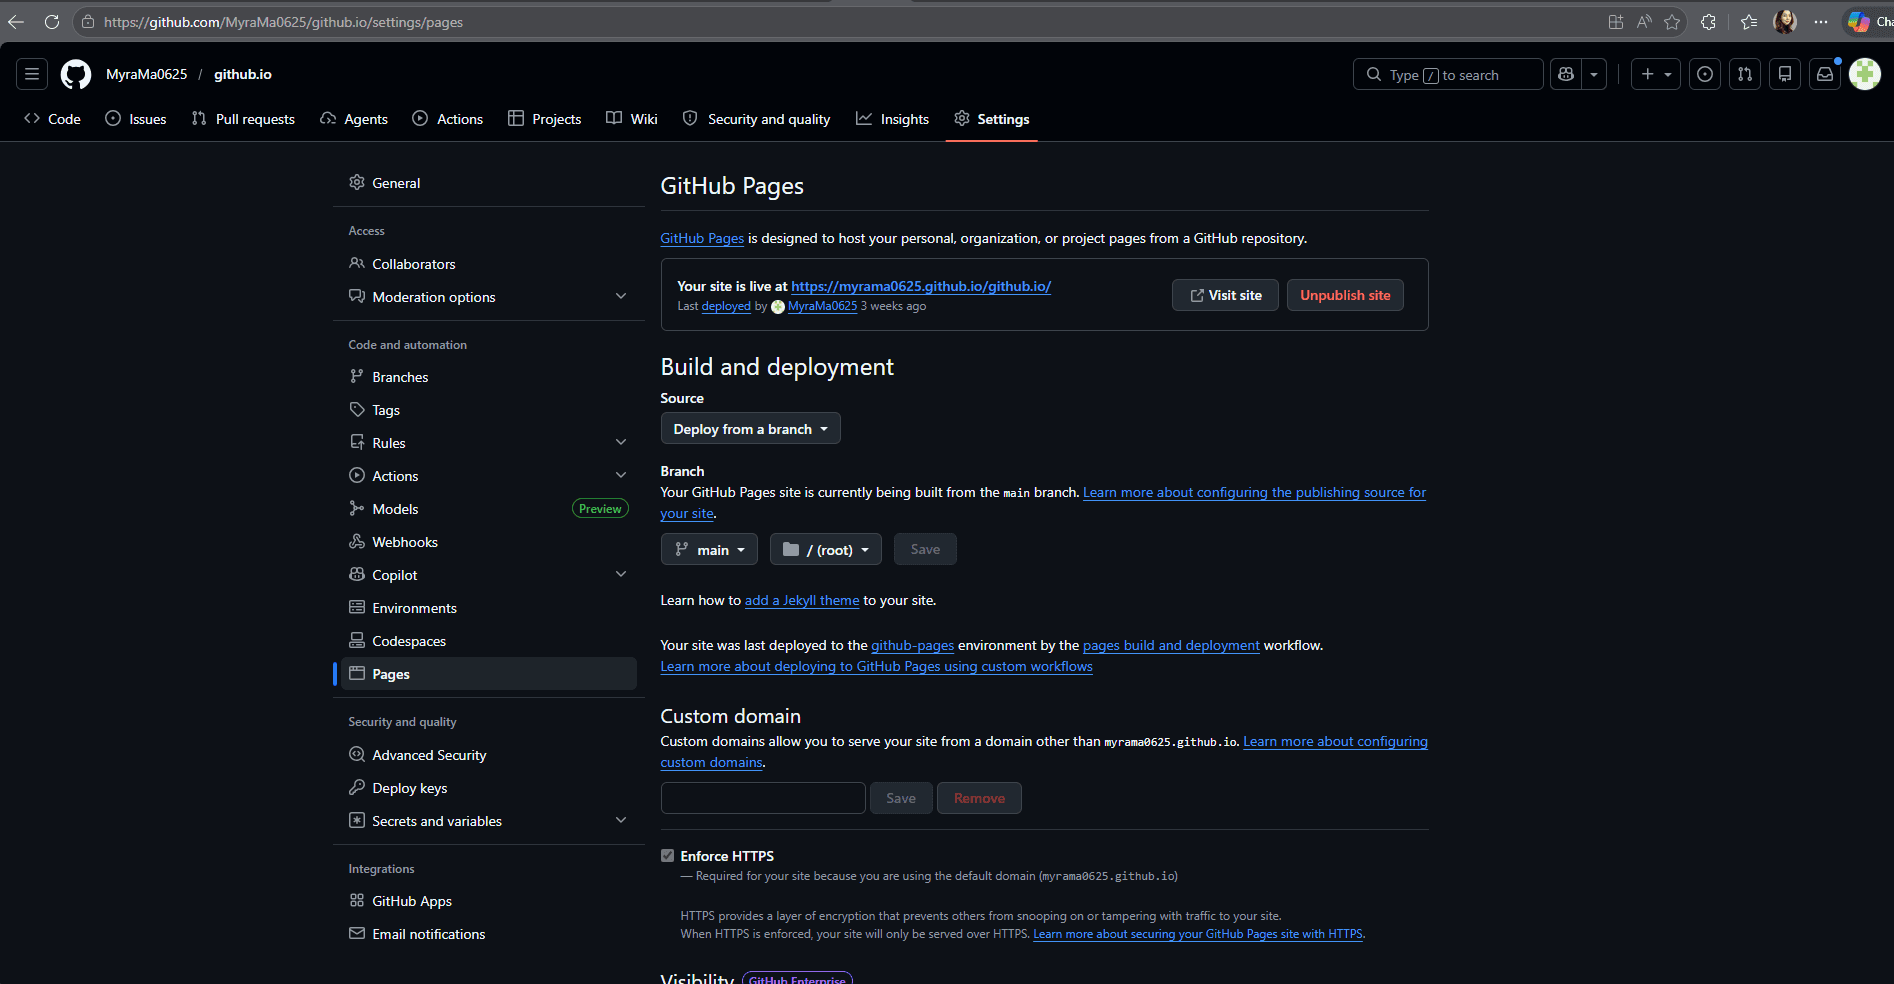
Step 5 — Turn on GitHub Pages
1. In your repo, click the Settings tab at the top.
2. In the left sidebar, click Pages (under "Code and automation").
3. Under Build and deployment → Source, choose Deploy from a branch.
4. Under Branch, pick main, leave the folder as / (root), and click Save.
5. Wait 1–2 minutes. GitHub builds your site and shows a green banner with your live URL.
First-time delay is normal It can take up to 10 minutes for the very first build. If you refresh and see a 404 page, give it a few more minutes — this is the most common point where people think something has gone wrong. |
Step 6 — Share, iterate, expand
Open your live URL in a new tab and share it. From this point forward, every change you commit to the repo updates the website automatically — usually within a minute or two.
Easy ways to keep iterating
• Ask Copilot for an improved version ("Add a section on Azure OpenAI Service with a comparison table") and replace the file.
• Add more pages by uploading additional .html files into the same repo.
• Add a custom domain later in Settings → Pages if you want a branded URL.
Tips and lessons learned
• A clear, single-line prompt is enough — but the clearer your structure ask, the cleaner the output.
• Always preview your HTML locally before uploading. It catches typos and broken sections in seconds.
• Keep the file name index.html. This single detail is the most common cause of 404s.
• Public repo + main branch = the simplest possible Pages setup. Skip Actions and custom workflows the first time.
• Treat the page as a living document. Re-prompt Copilot whenever new capabilities ship and replace the file.
My biggest takeaway Copilot didn't just save me time — it gave me a structured mental map of Microsoft AI that I now use in customer conversations. The HTML page is the artifact, but the real outcome is faster, deeper understanding. |
Watch along — public videos
These are public, freely available videos that walk through the two halves of this workflow — generating HTML with Copilot, and publishing static sites on GitHub Pages.
Generating HTML with Microsoft Copilot
▶ Microsoft Copilot — Lesson 10: Generating HTML Channel / source: TutorTube on YouTube |
▶ Microsoft 365 Copilot — official video tutorials Channel / source: Microsoft Support |
Publishing on GitHub Pages
▶ How to Deploy a Static Website to GitHub Pages — Free Hosting Tutorial Channel / source: Corey Schafer on YouTube |
▶ GitHub for Beginners: Getting started with GitHub Pages Channel / source: The GitHub Blog (with embedded video) https://github.blog/developer-skills/github/github-for-beginners-getting-started-with-github-pages/ |
Resources and links
My live site: https://myrama0625.github.io/github.io/
Microsoft Copilot: https://copilot.microsoft.com
GitHub Pages quickstart (official docs): https://docs.github.com/en/pages/quickstart
GitHub Pages — full documentation: https://docs.github.com/en/pages
Microsoft AI — capabilities overview: https://www.microsoft.com/en-us/ai
Reuse and remix Feel free to take this walkthrough, share it, fork the live site, and adapt the prompt for your own crash course on whatever topic you're learning next. That's the whole point — turn what you learn into something the next person can build on. |